 I consider myself a curious person and I am always eager to understand / learn how things work.
For the gpf-js library, I wanted to follow TDD practice.
However, tools such as Mocha / Jasmine were not compatible with all the environments I wanted to support.
Hence, I had to develop my own.
A big thank you to Jonathan who reviewed most of this article.
What are TDD and BDD?
Let's talk about testing
TDD stands for Test Driven Development: long story short, the idea is to write tests first, then write the code that passes these tests.
The benefits are huge:
- Efficiency: you develop only what is needed
- Quality: you ensure that any modification does not break what was working before
- Maintainability: you don't fear changing the code as you know it is tested
According to uncle Bob, the exact steps are:
- You must write a failing test before you write any production code.
- You must not write more of a test than is sufficient to fail, or fail to compile.
- You must not write more production code than is sufficient to make the currently failing test pass.
BDD is just a rewording of TDD to make it more behavior-oriented when it comes to writing the tests. In the end, it is still TDD.
Frameworks
There are lots of frameworks to implement TDD. Each one has its own PROs and CONs in terms of:
- Features: testing helpers (asserts, hooks, mockups), integration with existing frameworks (such as AngularJS, ExtJS), support of UI automation, support of asynchronous calls, support of browsers...
- Implementation: how much effort it takes to implement the framework, how much effort it takes to write tests
- Performance: how much time it takes to run the tests
I will not pretend that I know them all, but, at the very least, I thoroughly experimented with the following:
- Siesta: the ExtJS specific testing tool
- Mocha: the JavaScript test framework
- Jasmine: another JavaScript test framework
Comparing to reality
OK, let's be honest: I did not start the gpf-js library by doing TDD first (can you believe it?). By the time I started writing this article, I was entrenched in a big refactoring of my code that changed it drastically (I applied very strict JSHint validation rules which broke everything).
Now, having around 200 tests running, I really see the value of automated testing !
- Code is always valid: I can quickly detect issues whenever I change some code
- Writing tests is a way to validate an API: indeed, whenever I want to develop a new feature, I don't even pay attention to whether or not it is technically feasible; I first write the code so that it can be used in an elegant manner. Thus, I start by writing tests.
- Tests are like documentation: have you ever checked the documentation of a big API? it is usually full of samples. Tests provide you with free, always up-to-date and valid samples.
Writing BDD
Basics
Whatever the code / UI you want to validate, you first have to define the tests you want to apply. BDD syntax introduces several keywords (functions) that help you organize your tests:
- describe is used to build a test suite, it takes two parameters: a label and a function. The label is used to identify the test suite, the function has the advantage of providing a private scope and, when executed, it should define specs.
- it is used to define a spec (a test), it takes two parameters: a label and a function. The label is used to identify the spec, the function is executed to evaluate the test. You may have several it in a describe. The test function usually relies on methods to validate conditions, I will introduce the simplest one: assert.
Sometimes, the function is not provided: the spec is considered pending
- assert is used to evaluate a condition, the signature of assert an assert may vary but, you should at least have a boolean condition. Usually, when the boolean condition is false, the assertion fails. This consequently fails the spec (test).
The level of granularity (details) you can grab from a spec depends on the framework you implemented. Sometimes, you have the call stack (showing you which line of the spec failed) but you may only have a failure notification (saying the spec did not pass the test).
That's why I advise to limit the spec content to a minimum number of assertions.
Here is an example of a simple test file:
/*global describe, it, assert*/
"use strict";

describe("My first test", function () {
    it("always succeed", function () {
        assert(true);
    });
});
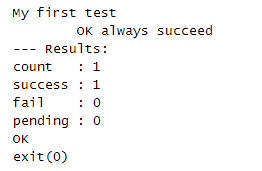
And the associated output:
Organizing the test suites
With these three functions, you can then organize your tests as you want.
- You may create one describe per functional module of your application.
- You may also have describe inside describe: this allows you to create a test suite tree.
Something important to remember: describe functions are executed to define specs but not to evaluate them. I can't tell for the other frameworks, but I expect the describe function to be called inside another describe, not in an it function.
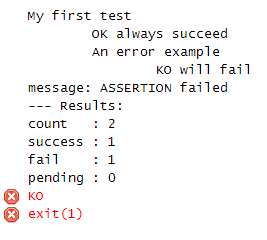
Here is an example of a describe in a describe with a failing spec:
/*global describe, it, assert*/
"use strict";

describe("My first test", function () {
    it("always succeed", function () {
        assert(true);
    });
    describe("An error example", function () {
        it("will fail", function () {
            assert(false);
        });
    });
});
And the associated output:
Setting up the contexts
Sometimes, you need context around the tests: you may need to mock some APIs by loading fake data or wrapping the functions, you may want to set up a page, or you might need some cleanup code once your tests get executed.
All the following keywords (functions) must be used in a describe, in any order. They all accept a function as the only parameter.
- before is triggered only once before executing any content (describe, it) in the describe
- after is triggered only once after executing any content (describe, it) in the describe
- beforeEach is triggered before each it of this describe (direct or recursive)
- afterEach is triggered after each it of this describe (direct or recursive)
Here is a usage example:
/*global describe, it, assert*/
/*global before, after, beforeEach, afterEach*/

"use strict";

describe("Context handling", function () {
    var context1;
    describe("Setting the context1 only once", function () {
        var MAX_LOOPS = 10,
            numberOfLoops,
            sumOfContext1,
            idx,
            label;
        after(function () {
            // It will be executed after terminating the describe
            assert(0 !== context1);
            assert(MAX_LOOPS === numberOfLoops);
            assert(sumOfContext1 / numberOfLoops === context1);
            context1 = 0; // Clean-up: back to 0
        });
        before(function () {
            // It will be executed before starting the describe
            assert(undefined === context1); // not initialized
            assert(undefined === sumOfContext1); // not initialized
            assert(undefined === numberOfLoops); // not initialized
             // Initialization: set to a random value
            context1 = Math.floor(1 + 100 * Math.random());
            sumOfContext1 = 0;
            numberOfLoops = 0;
        });
        // loop 10 times and check that context1 always have the same value
        function testIfTheSame() {
            sumOfContext1 += context1;
            ++numberOfLoops;
            assert(sumOfContext1 / numberOfLoops === context1);
        }
        for (idx = 1; idx <= MAX_LOOPS; ++idx) {
            label = "context1 remains the same (" + idx + "/" + MAX_LOOPS + ")";
            it(label, testIfTheSame);
        }
        /* In this sub context,
         * the value of context1 will be changed for each it using beforeEach
         */
        describe("Changing context1 for each test", function () {
            var context1Backup,
                lastContext1;
            before(function () {
                // The parent describe defined context1
                assert(0 !== context1);
                // When leaving this describe, we will restore the value
                context1Backup = context1;
                // This remembers the last encountered value
                lastContext1 = -1;
            });
            after(function () {
                context1 = context1Backup; // Clean-up: restore the value
            });
            beforeEach(function () {
                var newValue = context1;
                while (newValue === context1) {
                    newValue = Math.floor(1 + 100 * Math.random());
                }
                context1 = newValue;
            });
            afterEach(function () {
                assert(lastContext1 === context1);
            });
            // loop 10 times and check that context1 changes every time
            function testIfDifferent() {
                assert(lastContext1 !== context1);
                lastContext1 = context1;
            }
            for (idx = 1; idx <= MAX_LOOPS; ++idx) {
                label = "context1 changes (" + idx + "/" + MAX_LOOPS + ")";
                it(label, testIfDifferent);
            }
        });
    });
    describe("Sibling describe lost context1", function () {
        it("context1 should not be set", function () {
            assert(0 === context1);
        });
    });
});
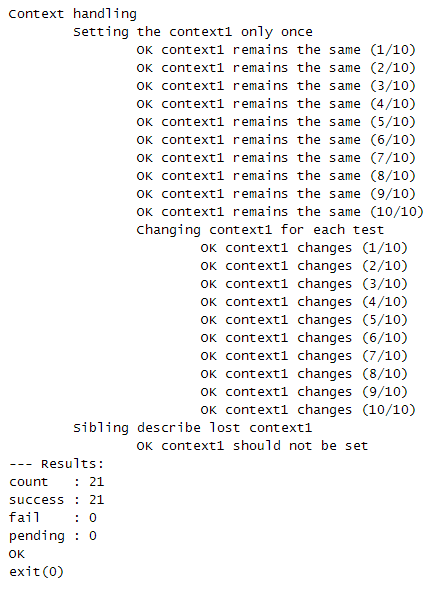
And the associated output:
Asynchronous testing
This is my favorite part and also probably the most tricky to implement. This functionality piqued my curiosity the first time I played with Mocha.
Whenever you have to develop an asychronous spec or if setting up the context involves an asynchronous call, how do you wait for the call to complete and how do you signal this completion to the test framework?
Depending on the framework, there are basically two ways (each framework may implement one, the other or even both of them):
- The spec/context function returns a promise: the framework waits for the promise to be resolved (or rejected which signals an error).
- The spec/context function accepts one parameter: if so, this parameter is a callback function used to signal the completion. This function also accepts a parameter to signal an error (when specified).
Here is an example (using callbacks):
To be able to test error cases and report on success, I added a third parameter to it in order to specify that an error is expected. If no error occurs, the test fails: it inverts the logic.
/*global describe, it, assert*/

"use strict";

describe("Asynchronous tests", function () {
    describe("using callbacks", function () {
        describe("synchronously", function () {
            it("supports synchronous call to done", function (done) {
                done();
            });
            it("fails if a parameter is given to done", function (done) {
                done({
                    message: "Error sample"
                });
            }, true);
            it("fails if an exception occurs", function (done) {
                assert(false);
                done();
            }, true);
            it("fails if done is called twice", function (done) {
                done();
                done();
            }, true);
        });
        describe("asynchronous", function () {
            it("waits for call to done", function (done) {
                setTimeout(done, 100);
            });
            it("fails if done is never called", function (done) {
            }, true);
            it("fails if a parameter is given to done", function (done) {
                setTimeout(function () {
                    done({
                        message: "Error sample"
                    });
                }, 100);
            }, true);
        });
    });
});
You may notice that JSHint reports the missing call to done
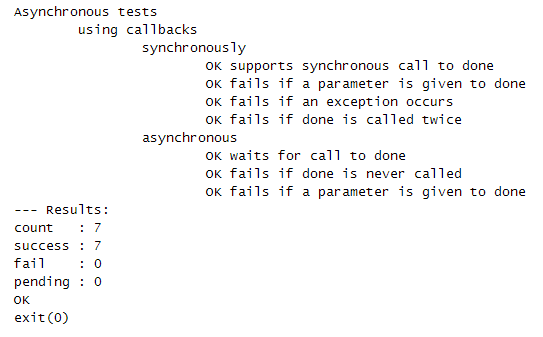
And the associated output:
Executing BDD
There are mainly three steps:
- Load the test suites
- Execute them
- Report on execution
Load the test suites
This part really depends on the framework you decided to implement. But, most of the time, it consists of loading (in this order):
- the code you want to test (the library or the application),
- the framework that implements BDD
- and, eventually, the files describing the test suites
Here is the source I use to test on Rhino:
You can check the file (and its revisions) on GitHub
/*jshint rhino:true*/
/*global run*/

print("Rhino showcase");
/*exported gpfSourcesPath*/
var gpfSourcesPath = "src/";
load("src/boot.js");

load("test/host/bdd.js");
load("test/host/console.js");

var sources = gpf.sources(),
    len = sources.length,
    idx,
    src;
for (idx = 0; idx < len; ++idx) {
    src = sources[idx];
    if (!src) {
        break;
    }
    load("test/" + src + ".js");
}

run();
gpf.handleTimeout();
run is the entry point that triggers the execution of the test suites.
gpf.handleTimeout provides asynchronous support to hosts that lacks it. I will soon write an article about it.
Execute and report on BDD
Again, this highly depends on the implemented framework. Execution can be done in a standalone page, script or within an application (like in Siesta). The outcome may differ but it must let you know:
- How many tests were run
- How many succeeded (and consequently how many failed)
- The list of failed tests
I recommend checking the documentation of the framework to know more about it (Mocha comes with a bunch of interesting visualisations for the output).
Implementing BDD
Forewords
The last part of this article provides some information on how I implemented BDD for the sake of testing the gpf-js library on cscript/wscript and later on Rhino. I had to develop a simple but yet functional testing framework that understands the test files developed for Mocha.
Since I have read Clean Code and The Clean Coder, both books from Robert Martin, I try to stick to very firm development rules. Indeed, I have defined very strict JSHint settings (even stricter than the ones validating sources on the blog) and this is visible in the way the source code is written: small functions with very little cyclomatic complexity.
Actually, I also added ESlint validation.
Also, the testing framework is tested (through test_bdd.html).
As I write this article, bdd.js seems to be in a stable state and, unless I find a bug or I get constructive feedback, it should remain as-is for a long time.
Last but not least, the usual disclaimers:
- I do not believe or even pretend that this is the best implementation ever: I would definitely recommend using well-known and widely used / tested frameworks such as Mocha or Jasmine. Again, this was created because of the lack of support in a specific scripting environment.
- I learned a lot by doing this but the process felt - a lot - like re-inventing the wheel. Obviously, in a real project, this has to be avoided whenever possible. But because it is a personal project, I have time. In the end, the lessons learned were worth the invested spent.
- You might find the following explanations incomplete (and they are) and I highly encourage you to read - or even better debug - the source to figure it out by yourself: code never lies!
- Things can obviously be improved, I always welcome feedback, please do so by adding comments to this article.
General structure of bdd.js
The file itself starts with an IIFE to create a private scope. One parameter (context) is expected. On the last line the function is invoked with this as a parameter.
Using this syntax allows me to receive the global scope object in the parameter context. Adding members on it will make them available globally in the scripting environment. This is how define, it and the others will be defined.
There is one exception: for NodeJS, each module (loaded with require) has its own scope, that's why we must use the global object after detecting the environment.
Now that I review this code, I realize I should have detected NodeJS the proper way (like in gpf-js).
The helpers
Since I wanted the file to be standalone, I had to include some helpers in it to ease the development:
- _objectForEach mimics the behavior of Array.forEach
- _toClass is used to create classes with inheritance, members and even some 'static' members (introduced with the keyword statics).
Hierarchical classes to define test suites and specs
To work properly, we must remember all the test suites and specs that are defined. As describe may contain other describe, this generates a hierarchical relationship between them.
The class BDDAbstract defines this parent / children relationship and offers a placeholder for a label. When the constructor is called with a parent parameter, this parent is modified to include the current instance in its children list.
The following code portion is really important and deserves some explanations: if (!parent.hasOwnProperty("children")) {
// Make the array unique to the instance
parent.children = [];
}
parent.children.push(this);
Adding a child to this array would make all instances of BDDAbstract have this new child (because of prototype inheritance). In order to distinguish the collections, we first verify if the children array is defined at the instance level (using hasOwnProperty). If not, the property is set with a new array.
The class BDDDescribe inherits from BDDAbstract and contains arrays to remember the before, beforeEach, after and afterEach callbacks defined within the describe. Also, some 'static' members are set to keep track of the root and the current describe item (used during the first pass). Finally, An helper is created to add a callback to the current describe.
Last but not least, the BDDIt inherits from BDDAbstract and keeps track of the spec callback.
Providing the BDD keywords
The next part declares the BDD keywords.
The _output function is designed to integrate with another module (console.js) that is capable of detecting unexpected outputs. Indeed, this is part of some GPF-JS tests. The exit function is used to end the tests. The iteration function checks first if the method exists before overriding it: this is helpful if you want to integrate your own version of assert or exit. But it is not recommended to override any other BDD keyword.
Default output handling
The next part takes care of the default output. The main idea is to provide all information to the caller through a callback so that he can format the output as needed. However, if no handler is specified, there must be a default behavior.
Three callbacks are defined:
- describe: is called whenever the content of a describe will be tested
- it: is called whenever the result of a spec is known (success or error)
- results: is called to summarize the tests execution
Tests runner
The test runner is probably the code where I spent most of the time. You may check the file history to see how many times I had to rewrite the algorithm.
Long story short, my biggest challenge was to found a way to conciliate the asynchronous callbacks with the synchronous ones in order to sequence everything the right way.
I came up with two ideas:
- A finite state engine to sequence the global execution
- A boolean result on each significant step to indicate if the processing can continue (synchronous) or if we must wait for next step (asynchronous)
It all starts with the main loop entry point. This function executes any pending callback (synchronously or not) and then invoke the state method.
Each state is represented by a constant that provides a member name to execute on the Runner instance.
STATE_DESCRIBE_BEFORE _onDescribeBefore
- Execute before callbacks (if any)
- Set state to STATE_DESCRIBE_CHILDREN
STATE_DESCRIBE_CHILDREN _onDescribeChildren
- If no more child, set state to STATE_DESCRIBE_AFTER (and exit)
- If child is an it set state to STATE_DESCRIBE_CHILDIT_BEFORE
- If child is a describe stack current describe and set state to STATE_DESCRIBE_BEFORE
STATE_DESCRIBE_CHILDIT_BEFORE _onItBefore
- Execute beforeEach callbacks
- Set state to STATE_DESCRIBE_CHILDIT_EXECUTE
STATE_DESCRIBE_CHILDIT_EXECUTE _onItExecute
- Execute the callback
- Set state to STATE_DESCRIBE_CHILDIT_AFTER
STATE_DESCRIBE_CHILDIT_AFTER _onItAfter
- Execute afterEach callbacks
- Set state to STATE_DESCRIBE_CHILDREN
STATE_DESCRIBE_AFTER _onDescribeAfter
- Execute after callbacks
- Set state to STATE_DESCRIBE_DONE
STATE_DESCRIBE_DONE _onDescribeDone
- If no more stacked describe, set state to STATE_FINISHED (and exit)
- Unstack describe (using LIFO), set state to STATE_DESCRIBE_CHILDREN
The execution of each callback (it test function, before, after ...) is carried out by the _monitorCallback method. Because it may lead to asynchronous processing, this function receives a completion callback (callbackCompleted) as well as a context (callbackContext).
I could have used promises but the goal was to limit the dependencies.
This function returns true if the callback is asynchronous (meaning the caller has to wait for the callback to complete).
Even if the executed function does not use the done parameter, it is created anyway as it will be the central point to handle the result.
The creation of the done function consists in:
- Creating a custom context, called monitorContext
- And binding it to the _done function
This trick is a little extreme in terms of readbility. Declared as a member of the Runner class, it is always executed with a value of this pointing to a different object.
In order to avoid confusion when calling the callback function, the method _secureCall will take care of invoking it with the right amount of parameters: if the signature confirms it accepts a parameter, it is transmitted. Otherwise, the callback is invoked with no parameters.
When creating the test cases, I realized that even when a function signature is empty, it can still access 'extra' parameters by checking the arguments object. Hence, I wanted to avoid the unexpected use of it.
Once invoked, the _processCallResult method will analyze the context and decide if the call is:
- synchronous: no parameter was expected and the result is not a Promise or the done function was called during the initial invocation.
- asynchronous: in any othe case, a timeout is created to monitor the execution time (configured through the main entry point). If the delay is reached, the callback / test case is failed.
Main entry point
The run function is declared at the very end of the file. It receives two optional parameters:
- callback: the output handler
- timeoutDelay: the maximum waiting time for asynchronous callbacks


No comments:
Post a Comment